Saturday, March 19, 2016

zwave reference info

Devices
1 x Leviton RZCPG-0SG - Vizia-RF Basic RF Programmer/Master Remote w/Clock and Base (LEVRZCPG-0SG) 
Intermatic HA02 lamp controller
https://github.com/openhab/openhab/blob/master/bundles/binding/org.openhab.binding.zwave/database/products.xml

Monster ml ld300

Reference for intermatic modules

Be within 6 feet on module

Exclude
Put controller in exclude mode, push program button on module.

Include
Plug a lamp into the module, make sure lamp is on
Push Program button on module until lamp comes on, and led blinks
Put controller into include mode


Leviton Switch
1 x Leviton RZI10-1LX - Vizia-RF 1000W Dimmer for Single Pole/3-Way (LEVRZI10-1LX)
1 x Leviton RZCZ4-1LX - Vizia-RF 4-Zone In-Wall Controller (LEVRZCZ4-1LX)

Exclude
Put controller in exclude mode
With Leviton controller, Menu, system setup, advanced settings, network
press "center button"

Include
Put controller in include mode
With Leviton controller, Menu, system setup, advanced settings, network
turn on dimmer switch (press main push pad)


ACT dimmer
ACTZDW120W

Friday, March 18, 2016

Samba

Setup Samba

Install Samba
Next, we’ll install Samba and share the configuration and user folders – this will make it easier to install add-ons and change the sitemap remotely.
sudo nano /etc/samba/smb.conf
Change the workgroup name if needed, but otherwise enable WINS support:
wins support = yes
(you’ll need to uncomment the line, and change no to yes)
then add the following to the share definitions section (scroll all the way down to the bottom of the long file):
[OpenHAB Home]
 comment= OpenHAB Home
 path=/usr/share/openhab

 browseable=Yes
 writeable=Yes
 only guest=no
 create mask=0777
 directory mask=0777
 public=no
[OpenHAB Config]
 comment= OpenHAB Site Config
 path=/opt/openhab
 browseable=Yes
 writeable=Yes
 only guest=no
 create mask=0777
 directory mask=0777
 public=no
I also commented out the Printers section. I’ve made two shares, since the configuration files are actually stored separately to the add-ons.
Save and exit. We finally need to set a Samba password for the openhab user:
sudo smbpasswd -a openhab
I’d suggest “openhab” as the password just for ease of use, but it doesn’t really matter.
Thanks to reader David L – it appears the method of restarting Samba has changed in the latest Raspian. Here’s the updated instructions:
sudo update-rc.d smbd enable
sudo update-rc.d nmbd enable
sudo service smbd restart
After restarting Samba (older installs use sudo service samba restart), test you can access the shared drive.
It might not be auto-discovered on a Mac; but you can use the
Finder -> Go -> Connect to Server and the address
smb://openhab@raspberrypi.local
Or, try address smb://openhab@192.168.1.80
Authenticate with username openhab and your chosen password, then open up both your shares to have a look around.  Select OpenHAB Config and OpenHAB Home.  It should open windows for both directories

Saturday, March 12, 2016

02 Raspbery Pi Setup

Pi Setup

Intro

Credits
I stole/copied/plagarized from these people
Make use of
Home Automation for Geeks

Links
Raspbian Image OS for the Raspberry Pi, pick "Raspbian Jessie" I download the zip file.
I used Raspian Jessie based on Debian Jessie Release Date 2016-02-26 Kernel Version 4.1
Win32 Disk Imager  Use to copy Raspbian OS to a SD card.  Also used to make SD backups.
MobaXterm  Terminal program to use to control the Pi


Main stuff to buy
Raspberry pi.  I started with the original pi, but I bought a pi3 soon after starting this project.
     a)  SD Card.  I used a 8gb because I had a spare one, but it turned out to be the right size.  The image is around 4gb after unzipping, so an 8gb card gives plenty of space to add the stuff you need.  You can use a 16gb card, but to backup you need to backup the image, so the larger the card the larger your backups will be.
     b)  USB Keyboard for pi (I already had one to use.  You only need it for the initial setup, takes a couple hours at most)
     c)  Monitor  (again you can use one you have.  The Pi needs a HDMI connector, again just for initial setup)
     d)  USB Mouse  (had one, initial setup)
     e)  USB power adapter with a micro USB cable for power.  Had some, I used a 2 amp power adapter.
     f)  Ethernet connection or wifi module for Pi.  I started using ethernet until I got a Pi3, with built in wifi.


Setup the SD card

I did this on a PC.
I did try to do it on a MAC, with these instructions to make the SD card, but it failed, so I moved to my PC.
I downloaded Raspbian Jessie zip file, full version not the lite one.  Takes a while because it was 1.3 Gb.  Upzip it, to get the image file.
Downloaded Win32 Disk Imager
With that utility, I was able to make a SD card with the Raspbian OS on it.

In the beginning, I plugged a USB keyboard, USB mouse, and my PC monitor into the Pi to bring it up.  I used a 2A USB power plug with a micro usb cable to provide power.  Also plugged in an ethernet cable to my router.
Plugged in my new SD card, and powered on.

After a minute or two, it came up.

If you're asked for a login, the default is "pi" with password "raspberry".
Select the menu icon in the top left corner, Preferences, Raspberry Pi Configuration
Select System, Expand Filesystem.  Change the password, change hostname if you want.
Boot to CLI (command line)
Select the localization tab, and setup Locale, timezone, keyboard and wifi country.
Select OK, and the select reboot


Network Connection
You will need to connect your Pi to your home network
Stole instructions from here, but I added to them a little.


Hardwired Ethernet Setup


By default, your router will assign a random IP address to the Pi. We want to change this to a fixed addressso you can always find your Pi. For this we need to edit the network configuration file.  

Type:          
sudo nano /etc/network/interfaces
The example below is for a network that uses the 192.168.1.x range. 
In the example, the Pi will have address 192.168.1.80 and the router is at 192.168.1.1
I don't know if it matters, but for security I would pick something other than ".80" for the last number, it has to be something you are not using, the numbers usually get filled up by the computers/phones/other wifi gadgets in your house starting  at 02.  It also has to be within the allowed range of your router, which is what is probably assigning these addresses to your various gadgets.
If your local network uses a different IP range, make sure to follow that instead.
auto lo
iface lo inet loopback
auto eth0

iface eth0 inet static
address 192.168.1.80  
netmask 255.255.255.0
gateway 192.168.1.1
When you're done modifying the contents of the file you press CTRL+X to exit. The program will ask if you want to save so you press Y for Yes and Enter to confirm the file name.

WIFI Setup

Like most house guests, your Pi wants to know how to connect to your wifi. We also want your router to assign a fixed IP address to the Pi so we can always find it. There are two configuration files we need to edit for this. First:
sudo nano /etc/network/interfaces
The example below is for a network that uses the 192.168.1.x range. In the example, the Pi will have address 192.168.1.80 and the router is at 192.168.1.1. If your local network uses a different IP range, make sure to follow that instead.
auto lo
iface lo inet loopback
allow-hotplug wlan0
auto wlan0

iface wlan0 inet static
address 192.168.1.80
netmask 255.255.255.0
gateway 192.168.1.1
wpa-conf /etc/wpa_supplicant/wpa_supplicant.conf
When you're done modifying the contents of the file you press CTRL+X to exit. The program will ask if you want to save so you press Y for Yes and Enter to confirm the file name.
Now in the second configuration file you enter your wifi details:
sudo nano /etc/wpa_supplicant/wpa_supplicant.conf
This file might be empty. Add the text below and replace "wifiname" and "wifipassword" with your network's details.
network={
ssid="wifiname"
psk="wifipassword"
key_mgmt=WPA-PSK
}
If your wifi network is more complicated, you can find online guides by googling "wpa_supplicant raspberry pi". When you're done, again exit with CTRL+X, Y, Enter.

Check Internet & Unplug

After you change settings it's usually a good idea to reboot your Pi and see if she understood you:
sudo reboot
When it's back up you can ping Google to see if you have Internet access:
ping www.google.com
If Google is replying, you're good. Exit "ping" using CTRL+C.
If ping is timing out (and you can access it fine from your other computers), double-check for typos in the configuration files. If that doesn't help, find help online or use your google-fu for clues.
Now that the Pi has Internet access and a fixed IP address, we no longer need to be connected to it. Before you unplug you should shut down your Pi:
sudo halt
Wait about half a minute for it to finish shutdown and then unplug screen, keyboard and mouse. You'll no longer need them. Then unplug & replug the Pi's power to boot it back up.
If you use a Windows PC, you can connect to the Pi using MobaXterm (or whatever SSH terminal program you like) on your computer, so you can open that program now. Give your Pi a minute to boot up and then start a session by clicking the session icon in the top left corner. Then enter you Pi's address and "pi" as the username.

You will see the window below.  You need to put in the Pi's address, the one from this line
address 192.168.1.80
Put in whatever address you entered in the remote host box.
Select OK.


Connecting to your Pi via MobaXterm.
You should get a new window, where its asks for you password.  Enter the password and you should get a command prompt.

Time to update the software on your Pi to the latest versions. This is like running Windows Update, but for your Pi. First run update, then upgrade:


Do this all as one line, but it will take a while.
sudo apt-get update
sudo apt-get dist-upgrade
After this, make a backup of the SD card.
Why? While playing around and testing things you might mess things up beyond repair. If you have a backup from this point in time, you'll save yourself a lot of frustration (and time) if you can go back to a point where you have a clean image all ready to go.
Before you can take out the SD card you need to shut down your Pi:
sudo halt
When it's powered down take out the SD card, plug it in your Windows computer and use Win32 Disk Imager to read from the SD card to an image file you save somewhere on your computer. 
Give it a file name that will tell you what it is, like raspbian_updated_20160311.img.

In WinDiskImager, type the file name as "e:\raspbian_updated_20160311"
This is with an external drive at e:.  If you used c:, it would write it to your root drive, which is fine too, you can just copy it to where you want it.

Then select read, and let it copy the image of the SD card.
Now you can put the SD card back in your Pi, boot it up, and not worry too much about making mistakes.

Now I changed my username, for security.  Harder for someone to break into your system if they don't know your username

See my other blog about changing the username.

I would make another backup after changing username.


01 Alarm upgrade /DIY Home Automation project

01 Home Automation Project

March, 2016

Intro

Credits
I stole/copied/plagarized from these people
Make use of
Home Automation for Geeks
Instructable for Webmin

Software Options

Decided to use OpenHab software running on a Raspberry Pi as the controller for my new home automation system.  Lots of help available.

Domoticz was another program that may have worked for this.  I picked OpenHab because although it looks like it is harder to use, it also seems like there is a large user base, and lots of tutorials and help available to get going on it.

Another program is Home Assistant, but that looks like it wants to run on a PC or mac on all the time, so I didn't use it.

Links
Raspbian Image OS for the Raspberry Pi, pick "Raspbian Jessie" I download the zip file.
I used Raspian Jessie based on Debian Jessie Release Date 2016-02-26 Kernel Version 4.1
Win32 Disk Imager  Use to copy Raspbian OS to a SD card.  Also used to make SD backups.
MobaXterm  Terminal program to use to control the Pi
Arduino Software  Software to compile and load Arduino programs into your board.


Existing zwave stuff
I already have a few zwave switches.  I have an old, hand held Leviton controller.

I also have a Monster AVL300 that is my HT remote.  The Monster controls lights in the breakfast room and family room, and can turn on and off the subwoofer and HT amp.  For now, I am going to leave this system alone.

The other zwave switch is in the hall way, its an older version of this Leviton switch.

Intermatic HA06??


Main stuff to buy
1.  Arduino (maybe more than one)
      a)  Power supply to power the Arduino.  Connector or wiring to hook power up.
      b)  May need a small case for mounting/installing, depending on where it goes.
      c)
2.  Raspberry pi.  I started with the original pi, but I bought a pi3 soon after starting this project.
     a)  SD Card.  I used a 8gb because I had a spare one, but it turned out to be the right size.  The image is around 4gb after unzipping, so an 8gb card gives plenty of space to add the stuff you need.  You can use a 16gb card, but to backup you need to backup the image, so the larger the card the larger your backups will be.
     b)  USB Keyboard for pi (I already had one to use.  You only need it for the initial setup, takes a couple hours at most)
     c)  Monitor  (again you can use one you have.  The Pi needs a HDMI connector, again just for initial setup)
     d)  USB Mouse  (had one, initial setup)
     e)  USB power adapter with a micro USB cable for power.  Had some, I used a 2 amp power adapter.
     f)  Ethernet connection or wifi module for Pi.  I started using ethernet until I got a Pi3, with built in wifi.
3.  RF link from Arduino to Pi.  I was going to us a RFM69hw, based on this, it has better range.  But it seemed like it would be harder to interface, especially from the Pi side.  So I went with a NRF24L01+PA+LNA instead.  This is a NRF24L01 type radio transceiver with longer range.  This type of module is very commonly used, and there are many examples to help figure out how to implement.

Other stuff to buy to make it useful.
1.  Relays  You need relays to do things like open/close a garage door, or turn on sprinklers.
2.  Magnetic Door sensors.  To sense if garage door, or any door is open or closed
3.  pir occupancy sensor.  To tell if someone is in the room

Setup the pi

Setup Webmin

Setup Openhab


Webmin Setup

Webmin

Webmin
In a previous project, I used Webmin, and liked it, so I'm going to use it again here.  It makes it easier for a windows user to control a linux system.

Copied instructions from here

SSH is a simple way to remotely log in to your machine’s command-line interface, but that’s not always the most convenient way to work. There is a wonderful web administration system called Webmin that can handle a lot of the “magic” of system configuration. Webmin can take care of a lot of the tasks you’d normally do from the command line, but in a much friendlier way. In addition, you can add Webmin modules for many of the features we’ll be adding to the Raspberry Pi in this series.
It’s pretty easy to install, so let’s get started.
You can’t just install Webmin through apt-get like the other software packages so far because apt-get doesn’t know about Webmin, or at least it doesn’t know about it yet. There are several approaches to a Webmin installation, but I’ve found that the easiest is to simply tell apt-get where to get the packages it needs for Webmin. Edit apt-get’s list of sources like this:
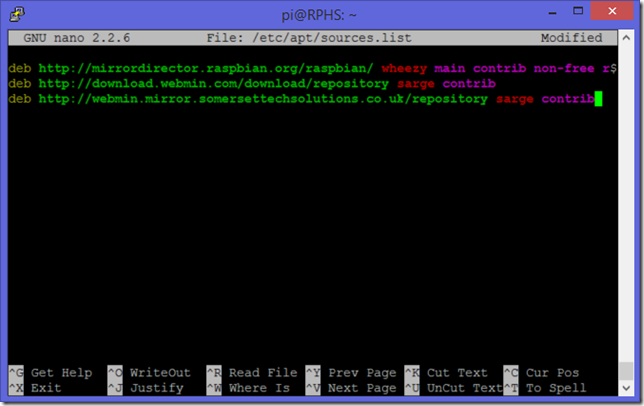
sudo nano /etc/apt/sources.list
When the editor appears, add the following two lines to the end of the file:
deb http://download.webmin.com/download/repository sarge contrib
deb http://webmin.mirror.somersettechsolutions.co.uk/repository sarge contrib
Note: Your browser may wrap these lines, but make sure they go in the sources.list as two lines like this:
image
Press Ctrl-x,y,enter to exit nano, saving the file. Next you’ll need to import the signing key that verifies the packages coming from the new repository. These next few commands need to be run as the actual root user of the machine. This is the first time this series has done this, so I’ll break it down for you. Type the following to temporarily become the root user:
sudo su
Your command prompt will change, losing all of its color, and becoming more sinister, dark, and dangerous looking like this:
image
You are now operating as the root user of the machine. The root user can do pretty much anything. Unlike the Windows world, Linux users try to spend as little time in “God-mode” as possible.
Type the following commands to import the Webmin repository’s signing key:
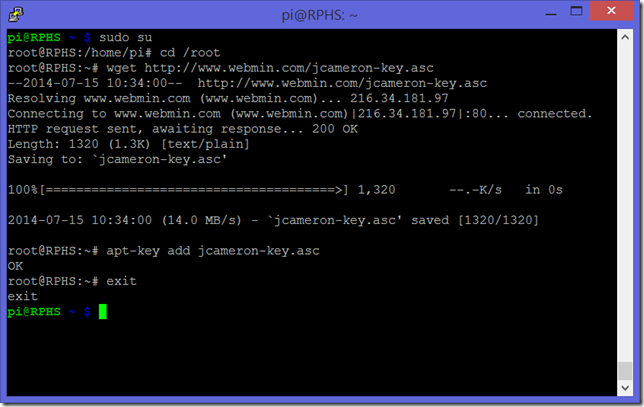
cd /root
wget http://www.webmin.com/jcameron-key.asc
apt-key add jcameron-key.asc
exit
That last “exit” tells the system that you want to stop being the root user now, and go back to being “pi”. The final result should look like this:
image
Now that you’ve added Webmin’s repository to the list of places apt-get will look for stuff, update the list of available packages again.
sudo apt-get update
Note: You may or may not see an error during this process. I presume that’s why the Webmin folks had you add two repositories, in case one of them is down. If you get an error, try the next steps anyway. If it still fails, double-check that you got the repository addresses exactly right, and try again.
Randy note:  It worked for me no problem.
Now that apt-get knows where to get Webmin, you can install it just like you have everything else so far.
sudo apt-get install webmin
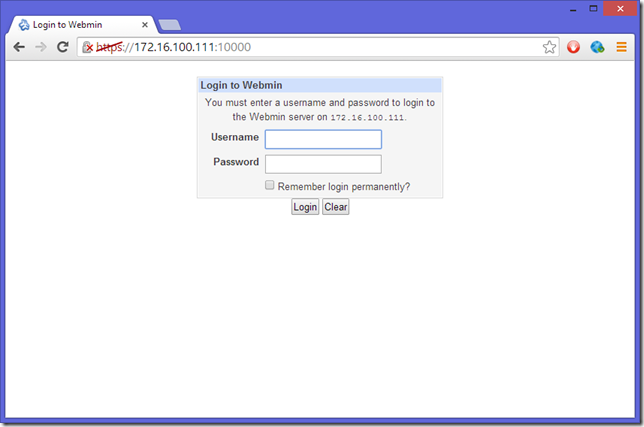
When the installation is complete, you can test it by opening a browser, and navigating to the IP address of your server, but specifying https and port 10000 rather than the default http port of 80. If you forget the “https” part, you’ll see a friendly page that offers to redirect you. Either way, you’ll probably also get a warning about the site not having a valid certificate, which it doesn’t. Proceed to the page anyway, and the result should look like this:
image
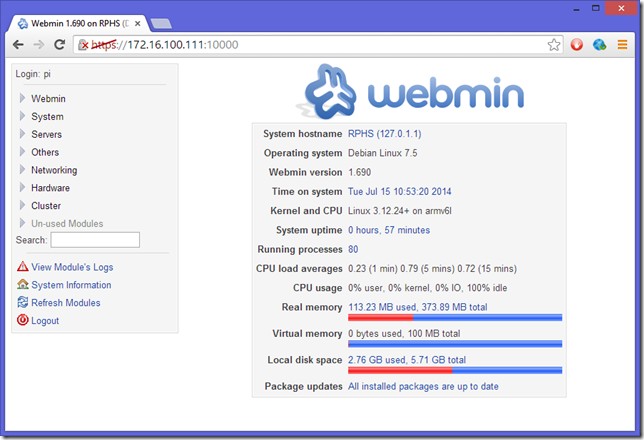
Log in as “pi”, and you’ll see the main Webmin interface, which looks like this:
image
Poke around a bit, and see what Webmin is all about. You can monitor storage and memory usage from here, be notified about updates, apply them, manage user accounts, and a lot more.
Look inside the “Un-used Modules” section to see all the things that Webmin could help you manage, if you had those packages installed. It’s a pretty impressive list.

Wrapping up

You’ve reached another milestone, and I strongly recommend politely shutting down the Raspberry Pi (sudo shutdown –h now), and taking another backup of the SD card.